Monday, August 9, 2010

Celebrity Inspired Makeup Tutorial - Alexis Bledel


We all loved her as Rory in Gilmore Girls. She was super cute in Sisterhood of the Traveling Pants. Yes, I'm talking about Alexis Bledel!

She has such a natural, girl-next-door look on- and off-screen. Love it! It's such a fresh look for daytime.


♥ ♥ ♥ ♥ ♥ ♥ ♥ ♥ ♥ ♥ ♥ ♥ ♥ ♥ ♥ ♥ ♥ ♥ ♥ ♥ ♥ ♥ ♥ ♥ ♥ ♥ ♥ ♥ ♥ ♥ ♥ ♥ ♥ ♥ ♥ ♥ ♥ ♥ ♥ ♥ ♥ ♥ ♥ ♥ ♥ ♥ ♥ ♥ ♥ ♥ ♥ ♥ ♥ ♥ ♥ ♥ ♥ ♥ ♥ ♥ ♥ ♥ ♥ ♥ ♥ ♥ ♥ ♥ ♥ ♥ ♥ ♥


Here's my version of Alexis' Natural Look, modeled by the beautiful Melissa. She's a Mineral Love user and fan that I had the pleasure of meeting this past weekend. :D Enjoy!

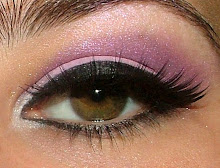
Eyes: Apply Chocolate Frosting on lid and into crease, slightly winging it up towards your temples at the outer edges. Apply Golden Girl to your brow bone for highlight, or for dark/deep skin tones use a shadow that is a little lighter than your skin color. Using a small angled liner brush, line the upper lash line using Anne (dark brown/black.) Finish the eyes with one coat of mascara on the upper lashes only.

Face: Use a lightweight foundation. (Melissa uses Mineral Love Mineral Foundation in the shade #1. Don't know what shade you are? Contact me for foundation samples at minerallove@hotmail.com) Complete your complexion with Ready, Set, Go! Finishing Powder.

Cheeks: Dust a peach shade of blush, like Peachy, along your cheek bones.
*Optional- Using the same brush, dip it into your Chocolate Frosting eyeshadow. This will be used to contour your face. To contour, take that brush and dust it directly underneath your cheekbones (in that little hollow where your teeth are) from basically your 'sideburn' area headed diagonally down towards your chin. However, don't go all the way to your chin; you want to stop about half way. Blend thouroughly (stay within that area and use tiny circlular motions with your brush to blend until you see no harsh lines.) This will make your cheekbones appear higher and add definition to your face.

Lips: Keep 'em simple! Use a peachy-pink lip gloss, like Peachy
If your lips are extra dry, use a lip balm first to soften. Layer the Peachy lip gloss (made with jojoba oil) over the balm to further moisturize, add shine, and give a hint of juicy color to your lips.

♥ ♥ Ta-da! A super pretty natural look inspired by Alexis Bledel. ♥ ♥

Here are some pictures by the beautiful Melissa:


If you try this tutorial for yourself, I'd love to see it! Head to http://www.facebook.com/minerallovecosmetics and post some pictures! Don't be shy. ;)

*footnote- The source of the Alexis Bledel photo above is Erica and Alexis Bledel The photographer of the aformentioned photo is not affiliated with Mineral Love in any way. All other photos are © Mineral Love 2010.

Friday, July 2, 2010

Mineral Love Cosmetics Review on YouTube


The adorable Kelsey from kendallandkelsey32 on YouTube did a review on quite a few of my eyeshadows. The video is awesome! Thank you so much Kelsey!! ♥
Her sister, Kendall, also made a tutorial using some of my eyeshadows. It's very pretty! Thank you Kendall! :D Don't forget to suscribe to their YouTube channel!!

Friday, May 28, 2010

Tutorial: Juicy Golden Bronze


Get this look!: Juicy Golden Bronze

Eyes: 1. Apply Pegasus to the brow bone for highlight.
2. Apply Golden Girl to lid.
3. Apply Clementine to outer half of lid and into crease.
4. Apply Tropical Bronze to outer 3/4 of the crease to add some definition. Blend.
5. Mix Tropical Bronze with Mineral Love Magic Mixing Medium. Then, using a small liner brush, line the lower lash line. Smudge with your finger to soften the line a bit.
6. Add black liquid liner to top lash line. Curl lashes, and finish with two coats of black mascara (or brown-black if you have light hair, so it's not as harsh.) Ta-da!


Face: Apply foundation to even out your skin tone. Conceal any necessary areas (under eyes, any blemishes, sides of your nostrils.) Dust a coral shade like Electrolight Coral from the apples of your cheeks, sweeping up towards your temples. Apply Pegasus as a highlight to your cheek bone.

Lips: I used a pink color I had handy, but this look also works well with peach or nude lip gloss. Keep your eyes the focal point.


*-* Special: Buy three Full Size Mineral Love Eyeshadows, and receive a free Mineral Love Magic Mixing Medium! Find it here. *-*


Tried this look? I'd love to see pictures! Please post your pics in the fan photos section of the facebook page here- Mineral Love Cosmetics

Wednesday, April 14, 2010

Tutorial: Rock n Roll Bombshell by Mineral Love


I have an 80's themed birthday party to attend this weekend, so I've been playing around with different eye looks. This was by far one of my favorites. I want to show you how to acheive this bad-ass Rock n Roll Bombshell look. Enjoy!


Get this look!: Rock n Roll Bombshell

Eyes- Phase 1- Apply Bombshell from upper lash line to above the crease, angling slightly upwards at the outer corner. Next, apply Christina on your brow bone. Blend the two colors where they meet (it will create a smoky effect.)

Phase 2- Using black liquid liner, line your upper and lower lash line, extending the point downward about a quarter-inch from the inner corner and upward about one-half-inch from the outer corner of the eye. *note- if you have trouble with traditional liquid liner (the kind with a brush applicator) try using a liquid liner with a "felt-tip" applicator. It's like using a marker; you'll have more control over the line.

*tip- Cotton swabs are a girl's best friend! The pointy ended ones (yes, that's the technical term) are awesome for cleaning up any mistakes. Just dampen with water or eye makeup remover to touch up any areas that went awry.

Phase 3- Use a black wax pencil to line your upper and lower water line. Apply black mascara to top and bottom lashes, applying as many coats as it takes to acheive spiky, rockerish lashes.


Face- Start with foundation to even out skin tone. Apply Frenchy along your cheekbones and the apples of your cheeks. Dust Christina onto the highest point of your cheekbone for highlight.


Lips- Mix Frenchy with your favorite clear lip gloss. Don't worry about lip liner; you want your eyes to take center stage for this look.


******

Love this look? I'd be happy to see your fan photos!

Visit http://www.facebook.com/minerallovecosmetics and post your take on this Rock n Roll Bombshell look.

Happy posting!

Monday, March 29, 2010

Tutorial: Green Goddess by Mineral Love


Get this look!: Green Goddess

Eyes- Use Mineral Love Magic Mixing Medium to apply Green Goddess to lids and into crease. Apply Pot O' Gold to brow bone for highlight, as well as the inner corners (near your nose) to brighten your eyes. Finish with black liner and a couple coats of mascara.

Face- Keep cheeks neutral, or dust the slightest bit of Pot O' Gold to cheeks for a gentle glow.

Lips- I rocked a bold pink lip here, but another option is a nude lip for daytime.

Thursday, March 11, 2010

Tutorial: Elise and Meadow Eye Look by Mineral Love


Get this look!: Elise + Meadow

Step 1. Use Mineral Love Magic Mixing Medium
with Elise. Apply to the eye lid and a little into the crease.

Step 2. Smudge Meadow in the crease, angling slightly up at the outer edge.

Step 3. Apply a light shadow like Christina to the brow bone for highlight.

Step 4. Finish up the look with black liner and two coats of mascara. Make the look more dramatic by adding fake eyelashes. Super cute!

♥Get this deal!: Purchase all three eyeshadows and get a free mixing medium
here!